1. Be sure you have your Windows 95 CD-ROM or Floppy Disks Handy
2.
Leave plenty of time to set up, (some computers take 20 minutes)
3. Click
on the Start Button.
4. Slide up to Settings
5. Slide across to
Control Panel
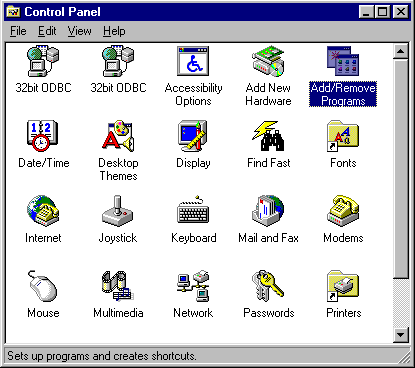
6. Double Click on Add/Remove Programs
7. Click the tab
labeled Windows Setup
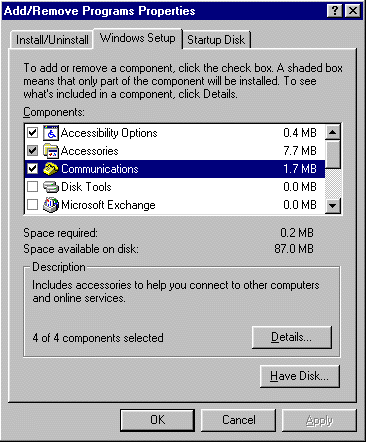
8. Then bring the scroll bar down to Communications
9. Click
Details
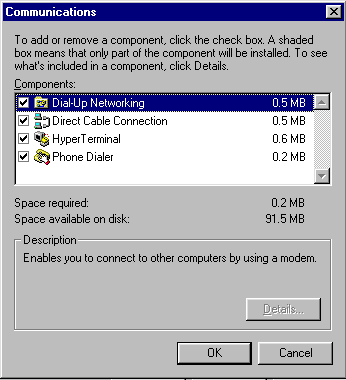
10. Put a Check mark in the Dial-up Networking box and Click OK
11. Windows will now install Dial Up networking for you.
12. Now Double
Click on "My Computer"
13. Double Click on Dial-up Networking
14. Double Click on Make New Connection
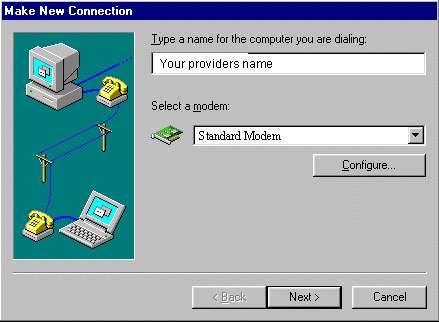
Fill out this screen as the graphic indicates Your modem will either
be standard 28.8k or 14.4k modem MAKE SURE YOU PICK STANDARD
28.8 or STANDARD 14.4 (if they are not listed install one in the control
pannel under modems, then pick add, then pick "Do not detect my modem I'll
pick it from a list.)
press NEXT
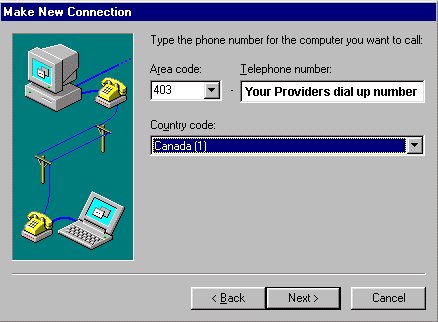
15. Fill out this screen as the
graphic indicates and press NEXT
After you have clicked NEXT this screen should appear.
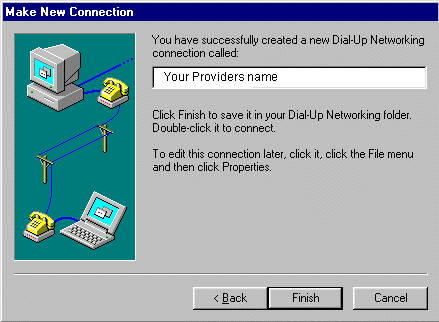
17. Click Finish.
Now we have to add TCP/IP Networking (The
language your computer uses to talk to the Internet) to your computer.
1. Click on Start
2. Slide up to Settings
3. Slide over
to Control Panel
4. Double Click on Networking
This Screen Should appear
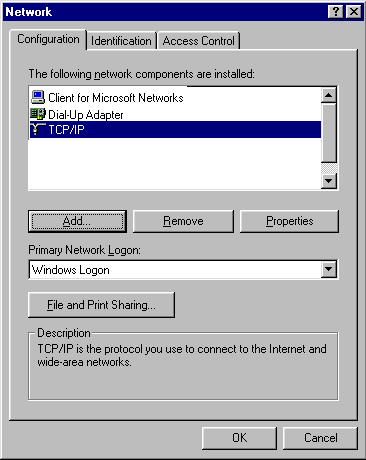
I Cannot stress enough that the ABOVE
SCREEN MATCHES EXACTLY,
if you have a problem it probably stems
from this screen 99% of the time this screen cannot deviate at all from the
above example,
this means if your screen has 3
TCP/IP's on it remove 2 of them !!
5. Now click on ADD
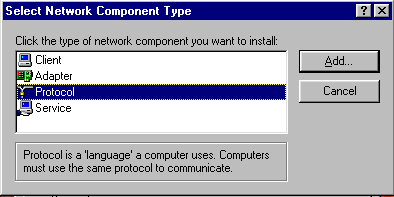
6. Pick Protocol and click add
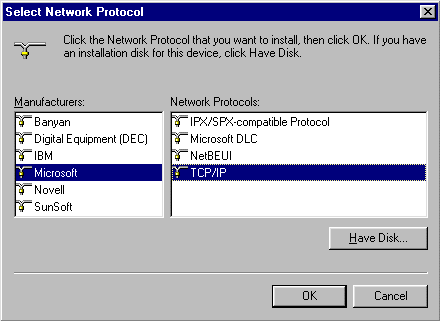
7. Pick Microsoft, and TCP/IP from the lists and Click OK
Windows will install the needed files from disk
8. Now Click on TCP/IP
9. Click on Properties (the following screen will appear)
10. Click
on IP Address from the tabs at the top of the screen.
11. Obtain IP
Address Automatically Must be checked off
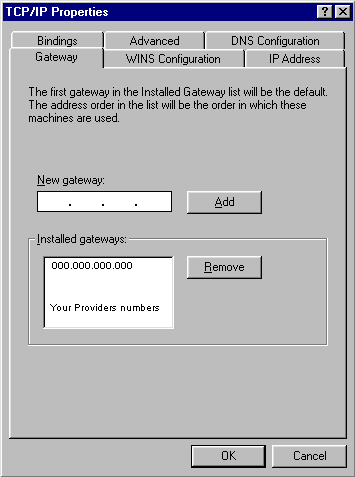
12. Click on Gateway type
000.000.000.000 (your ISP'S Numbers) Press Add
(the address you typed will
move down to the lower box)
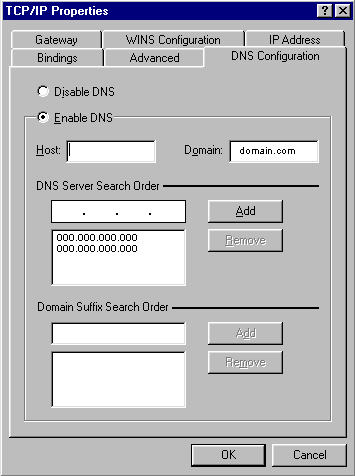
14. Now Click on DNS Configuration click Enable DNS
15. In
the box labeled DNS Server Search Order
16. Type 000.000.000.000 (Your
providers DNS Numbers) and press add
17. type 000.000.000.000 (Your
providers secondary DNS Numbers and press add
18. in the Host box type in
your login ID
19. in Domain type in yours providers domain name
20. Press OK
21. In the next screen Press OK
22. The
computer will now need a reboot
23. press OK to reboot the machine
24. You are now setup for Dial up networking
Then Type
"EXIT" and REBOOT
the computer.
25. Now to connect to the Internet open up "My
Computer" open Dial-up networking and Click on "Internet Providers
Name" (You could drag this icon onto the desk top making a short cut)
This screen will show up
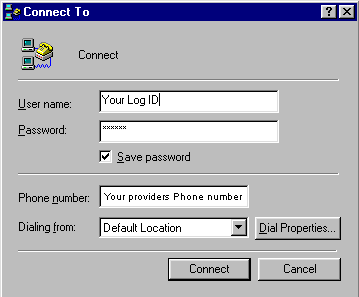
26. Type in your user name in the User name box
27. Type in
your Password in the Password box
28. Check off save password (this may
not work on all installations)
29. Click Connect
30. The computer
will dial and go through a login sequence once you see a "Connected"
screen Surf the net !
This Document is Copyright 1996 I Don't Know Computer
Services Unauthorized Copying in whole or in part Prohibited without written
consent of the owner.
E-mail the author
idk@idontknow.com Visit our WebSite
http://www.idontknow.com